Setup and run your own call center PBX integrated with CRM part-3
continuing the Series, by this far, you should have Asterisk PBX and Vtiger CMR installed on your server and now we are ready to integrated them. Setting up PBX Manager with Asterisk
continuing the Series, by this far, you should have Asterisk PBX and Vtiger CMR installed on your server and now we are ready to integrated them.
Setting up PBX Manager with Asterisk
Step 1: Install & Configure Asterisk
Configure:
Take backup of sip.conf and extensions.conf file in /etc/asterisk folder
root@host$ sudo cp sip.conf old-sip.confuser-ThinkPad-T410:~ user$ sudo cp extensions.conf old-extensions.conf
Edit sip.conf file
root@host$ sudo vi /etc/asterisk/sip.conf
Configure the sip.conf file with the sample-sip.conf file
Edit extensions.conf
root@host$ sudo vi /etc/asterisk/extensions.conf
Configure the sip.conf file with the sample-extensions.conf file
Edit Asterisk cdr configuration file: (cdr_manager.conf) : download sample-cdr_manager.conf file to configure
Edit Asterisk manager configuration file: (manager.conf) :download sample-manager.conf file
To apply changes restart Asterisk
root@host:~ user$ sudo /etc/init.d/asterisk restart
Launch Asterisk CLI
root@host:~ user$ sudo asterisk -rvvv
V’s are verbose level
root@host*CLI> sip show peers /* It lists registered users in sip.conf with status unmonitored */
Step 2: Install Softphone — ZoIPer
- Create an account in ZoIPer
- Choose SIP option.
Credentials:
user/user@host : 7002@10.2.1.20
Password : 7002login
Domain / Outbound Proxoy : 10.2.1.20
3. Click Next → Account Name (7002@10.2.1.20) → Next
Now your account has been registered in your Asterisk server. You can verify the request and response in Asterisk CLI window.
Step 3: Install Vtiger Asterisk Connector
Vtiger Asterisk connector is a gateway to connect Asterisk server and your Vtiger CRM. It helps to make interaction over HTTP when it handles incoming or outgoing calls.
Features:
- Pops out notification on incoming call.
- Transfers the input from Vtiger to Asterisk.
- Manages call record file.
Installation & Configuration:
- Download Vtiger Asterisk Connector
- Unzip the downloaded package in CRM root directory
- Edit VtigerAsteriskConnector/VtigerAsteriskConnector.properties file to make the following changes
Location where the application server will be running.


Call Recordings storage path


Location where the applications database files will be stored.


Asterisk Server Details


Vtiger CRM URL


Step 4: Configure PBX Manager in Vtiger
1. Login to your Vtiger CRM.
2. Click CRM Settings → Integration → PBX Manager.
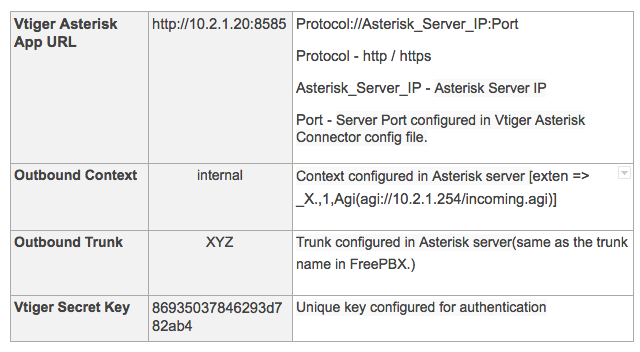
3. Edit Asterisk Server Details.


Configure user extension number:
1. Open My Preferences.
2. In “More Information” block configure the user number in CRM Phone Extension field. Eg. 7001
3. Start Asterisk Connector. In terminal execute lines one by one
root@host$ cd VtigerAsteriskConnector/bin/user-ThinkPad-T410:~ user$ ./start.sh /* To start Asterisk Connector */
Note:
To refresh Asterisk connector
root@host$ ./start.shuser-ThinkPad-T410:~ user$ ./stop.sh
To verify, you can run Protocol://Asterisk_Server_IP:Port (http://10.2.1.20:8585/)
Troubleshooting Tips:
If you make any changes in sip.conf restart
root@host*CLI> sip reload
If you make any changes in extensions.conf restart
root@host*CLI> dialplan reload
If you need to track you can use the logs from VtigerAsteriskConnector in Logs folder
We believe this guide helped you integrate your Asterisk with your Vtiger CRM and get the best out of your CRM. We have given a sample of integration, you can enhance it further more and do more. You can extend it to add lots of features and make your work simple. If you have any questions or further help in extending your Vtiger CRM with advanced functionalities, you can get help from us.
Gopal Jani
https://www.linkedin.com/in/gopal-jani/


No comments yet. Login to start a new discussion Start a new discussion